Setting up MongoDB with Kratix and Port
- Jubril Oyetunji

- Jun 17, 2025
- 7 min read
Updated: Jun 18, 2025
Nearly every web application has some kind of datastore, be it an online store where you purchase items from, your favourite social media sites, or the banking applications you use for daily transactions.
When building any application, your schema will naturally evolve over time. This is why many developers turn to NoSQL databases for their datastores, which gives them some level of flexibility with how they structure their data. MongoDB is a popular NoSQL database that has won the hearts of many developers.
As a platform engineer, while MongoDB solves your organisation’s data modelling problems, managing its deployments at scale to meet multiple teams' demands can quickly become a nightmare.
This guide will show how to use Kratix and Port to alleviate some of the pain of creating and managing MongoDB instances at scale.
How does Kratix integrate with Port?
Kratix is an open-source framework for building internal developer platforms (IDPs). It automates deployments using a familiar GitOps workflow and native Kubernetes resources. Kratix does this by using a concept called Promises, which act as reusable, declarative templates for your platform components.
On the other hand, Port is an internal developer portal that allows developers to request custom resources through an intuitive interface. This is beneficial because it breaks the cycle of creating a ticket for a resource and waiting an arbitrary amount of time for the platform team to create your database instance.
Port can do the same for Kubernetes resources through its Kubernetes exporter. The problem with this is that you have to manually create the definitions for these resources within the dashboard.
As you can imagine, this can become a challenge when you need to manage more than one custom resource.
Kratix solves this through its Port integration, which is part of the Syntasso Kratix Enterprise (SKE) offering. The SKE Port integration does this by creating the required blueprints from a Promise when you add the annotation kratix.io/get-port: "true", saving you a ton of time creating or debugging blueprints, allowing your platform team to focus on delivering the platform.
Implementing MongoDB with Kratix and Port
In this section, we will set up everything needed to deploy a MongoDB database with Kratix and Port.
We will set up the Kratix MongoDB Promise and deploy Port to create an intuitive UI for developers to request resources and for the required teams to perform Day-2 operations on the database. Day-2 operations in this context refer to post-deployment operations, such as upgrading or deleting a database.
Prerequisites
To follow along with this demo, ensure you have the following tools set up:
Docker: Required for deploying the containerised workloads.
KinD (Kubernetes in Docker): This is a lightweight solution for running Kubernetes clusters locally. Other Kubernetes distributions, such as Minikube or K3S, can also be used.
Kubectl: The Kubernetes command-line interface used to interact with your cluster. Kubectl is used to manage workloads and deploy resources.
An existing Kratix installation is required for Kratix to deliver the MongoDB promise from a configured Git repository.
Helm: The package manager for Kubernetes, required for installing Port and other components.
SKE: Syntasso Kratix Enterprise (SKE) is the enterprise version of Kratix. Port integration is not available on the open source version of Kratix so we integrate it using the enterprise version.
Step 1: Install the Port Helm chart and custom controller
Create a Port account
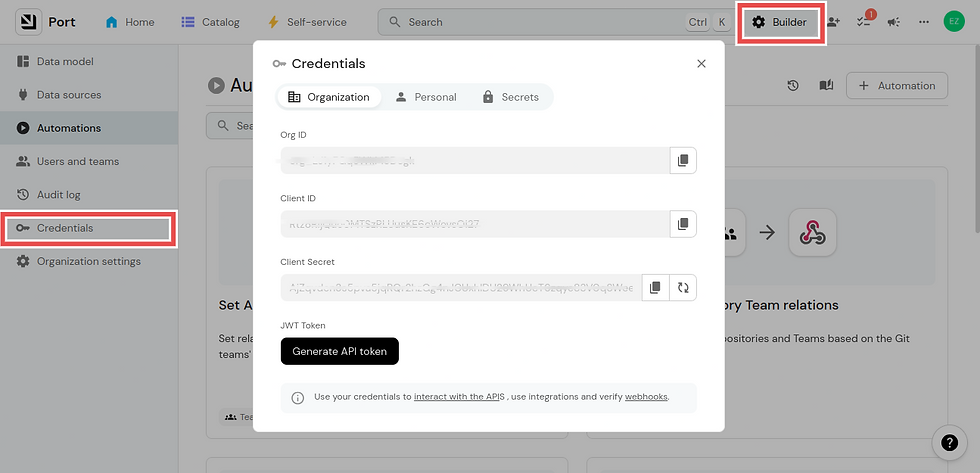
Sign up on Port using your organisation's email. Create the account with your username and password, and fill in all relevant credentials. Once you have it all set up, you’ll see the following dashboard.

Click on Builder and navigate to the side panel and click on Credentials. It will show you the Org ID, Client ID, and Client Secrets. These will be useful to you when setting up your Kubernetes cluster.
Install the SKE Port controller on the Kubernetes cluster
Port offers a Kubernetes controller for syncing MongoDB cluster data into Port’s UI.
By installing the SKE Port controller with Kratix, you automate the management of Promises and resources. You also need to set up a GitHub repository as a backend for Port’s self-service actions.
You need the SKE token for this setup. You can request one by navigating to the Syntasso Pricing page and clicking on Try SKE Today.
After obtaining the SKE token, certain environmental variables are needed to make the port controller work.
PORT_CLIENT_ID and PORT_CLIENT_SECRET are obtained from your Port account Builder dashboard.
PORT_GITHUB_ORG is the username or organisation name of your GitHub account.
Optional variables (defaults shown):
PORT_GITHUB_REPO (default: port-syncer)
PORT_GITHUB_WORKFLOW_FILE (default: port-action.yml)
PORT_CM_NAME (default: ske-port-k8s-exporter)
PORT_CM_NAMESPACE (default: ske-port-controller-system)
PORT_SKIP_DELETE_BLUEPRINT (default: false)
Create a secret with your environment variables using the following commands:
Additionally, you will need to set your SKE token as a registry secret:
Be sure to replace it with your SKE-TOKEN.
After this setup, configure the SKE port controller using the following commands:
Install the SKE Port controller:
Version 0.1.3 was used in this tutorial. However, you can find future releases over here.
Once everything is set up, run
kubectl get all -n ske-port-controller-system to ensure your installation was successful. You’d see the following output on your command line

Set up GitHub Actions backend for Port Actions
After setting up the Port controller on your cluster, the next step is to create a GitHub action to sync resources in Port to your repository. Recall that Kratix follows the GitOps philosophy; as such, your Git repository remains the source of truth for your deployments.
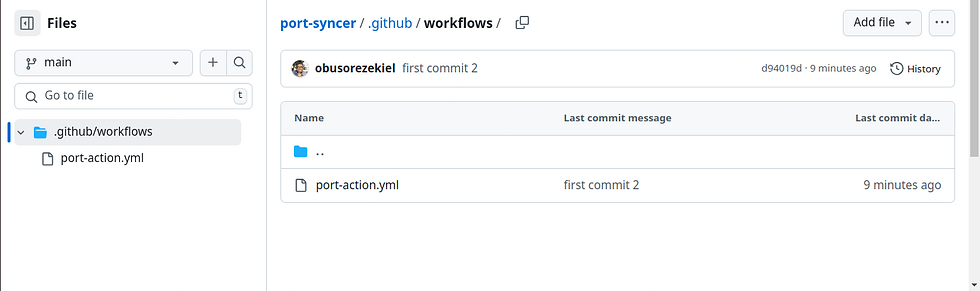
Create a new repository named port-syncer under your GitHub account. If you named it something else while setting PORT_GITHUB_REPO, ensure it corresponds.
Next, create a workflow file named port-action.yml (or your PORT_GITHUB_WORKFLOW_FILE name), and add the following pipeline configuration.
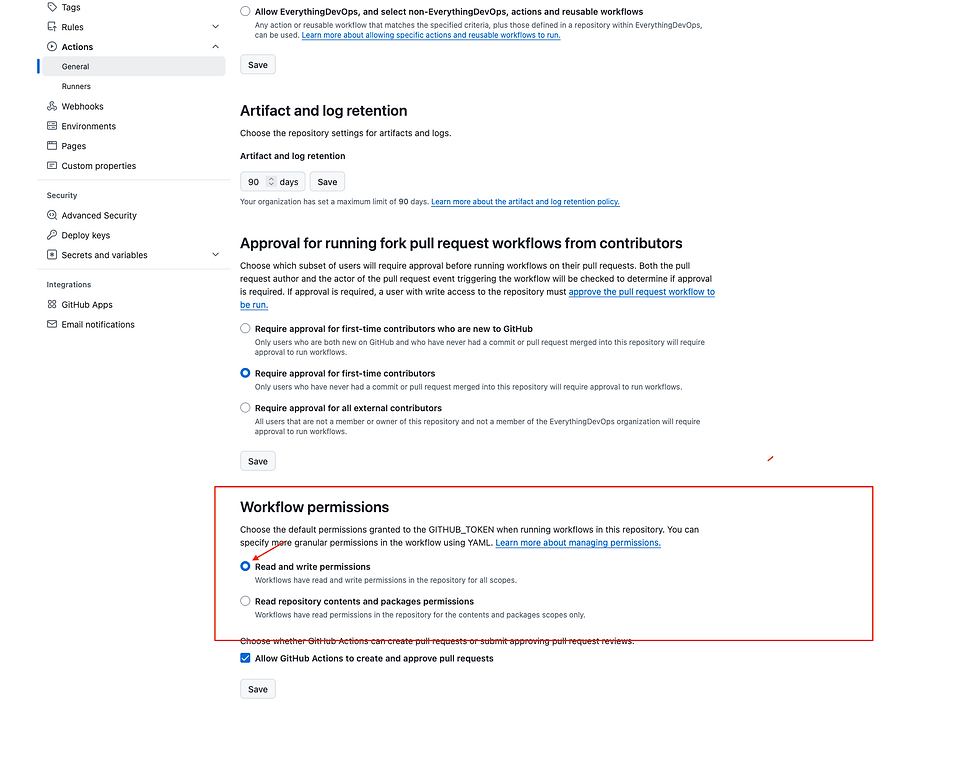
Additionally, you will need to enable read and write permissions for your GitHub runner. You can enable this by navigating to the repository Settings > Actions > General
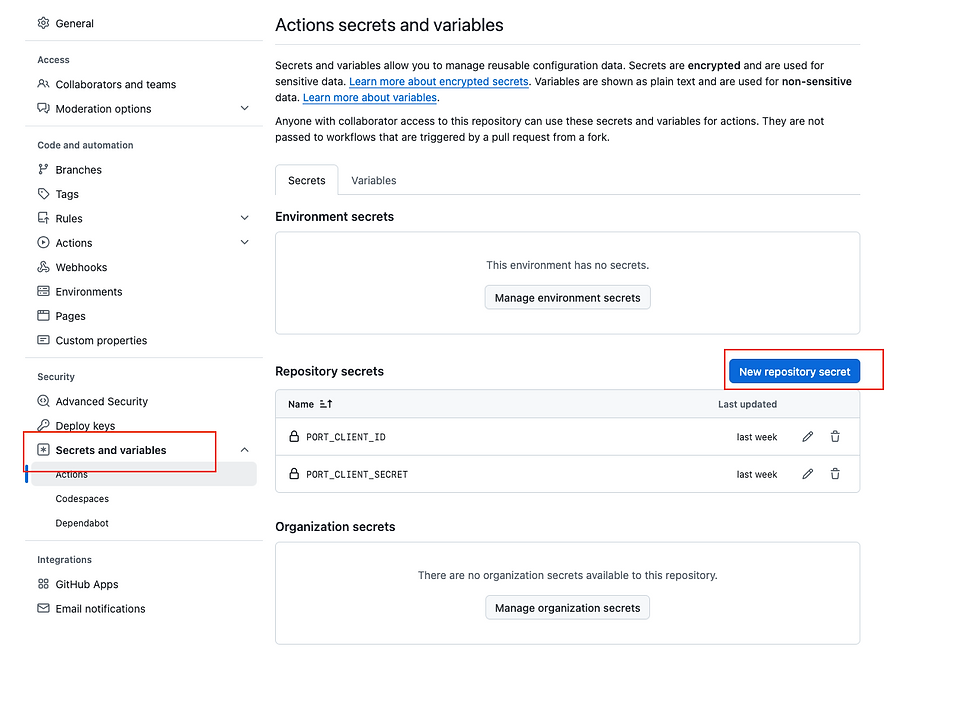
While in your repository settings page, you will also need to set PORT_CLIENT_ID and PORT_CLIENT_SECRET as secrets.
Do this by clicking on Secrets and variables on the left-hand side of the sidebar.
With the GitHub Action configured, the next step is to inform your cluster about it.
Create a Git repository in Flux
Flux provides a custom resource definition called GitRepository, which you can use to tell Flux what repositories to watch. For this demonstration, you want Flux to watch your port-syncer repository, specifically the kratix/platform/resources/ directory, where all databases created through Port will be stored.
To do this, run the following command and be sure to replace with your own repository:
```bash
kubectl apply -f - <<EOF
---
apiVersion: source.toolkit.fluxcd.io/v1
kind: GitRepository
metadata:
name: kratix-port-resources
namespace: flux-system
spec:
interval: 5s
ref:
branch: main
---
apiVersion: kustomize.toolkit.fluxcd.io/v1
kind: Kustomization
metadata:
name: kratix-port-resources
namespace: flux-system
spec:
interval: 3s
sourceRef:
kind: GitRepository
name: kratix-port-resources
path: "kratix/platform/resources/"
prune: true
EOF
```
Verify that the manifest was applied by running:
The output is similar to:

Step 2: Install the MongoDB Promise via Kratix
With Kratix and the SKE Port controller installed, we will create a Promise to deploy a MongoDB database to the cluster.
To create the Promise, write a YAML file that includes configuration details, such as the pipeline used in creating the Promise. Also, add the following labels to the MongoDB Promise YAML file so that the Port will detect the Promise once you create it.
As you can see, the YAML above defines a Kratix Promise that delivers MongoDB as a self-service platform capability. There is an API definition that creates a new CRD called MongoDB, which developers use to request instances. The majorVersion field lets users specify the MongoDB version (4,5, or 6).
There’s the resource configuration section that triggers when the developers request a new MongoDB instance.
To deploy the Promise, save the YAML file as mongodb-promise.yaml and run using the following command:
Step 3: Verify the MongoDB Promise and Port integration
To verify the successful integration of MongoDB and Port on your cluster, run the following commands
```bash
kubectl logs ske-port-controller-controller-manager-769b6749fc-q286k -n ske-port-controller-system
```This command checks the logs of the ske-port-controller pod to ensure that MongoDB and Port have been synchronised properly. Once you check the logs, you’d see the following output:

Step 4: Deploy a MongoDB instance via Port UI
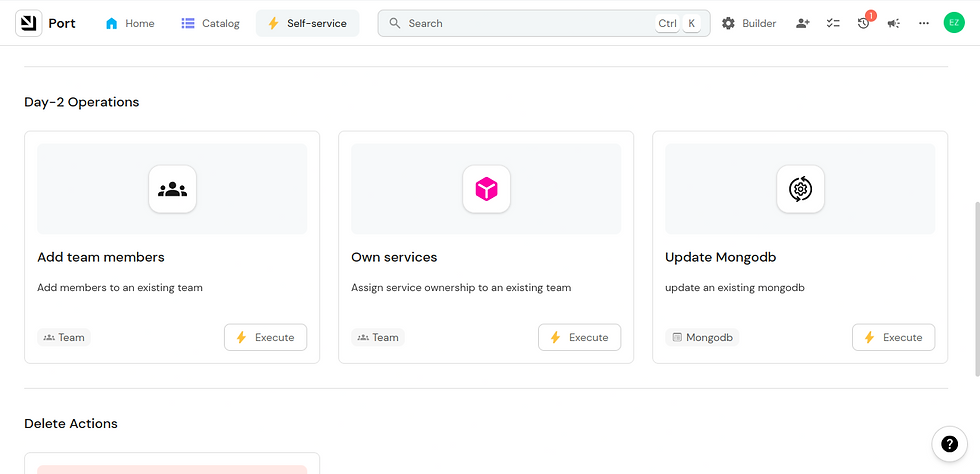
On your Port dashboard, once the installation is successful, click on the Self-service button at the top corner, and you’ll see MongoDB as part of the self-service options in Port’s UI. This is similar to the image below:

From the self-service dashboard, you can create, update and delete MongoDB resources.
To request a MongoDB resource from Port’s UI, click on create, and a pop-up will appear. Add the Major Version, which is the version of the MongoDB database you would like to create, the request_ID, and the version of this request.
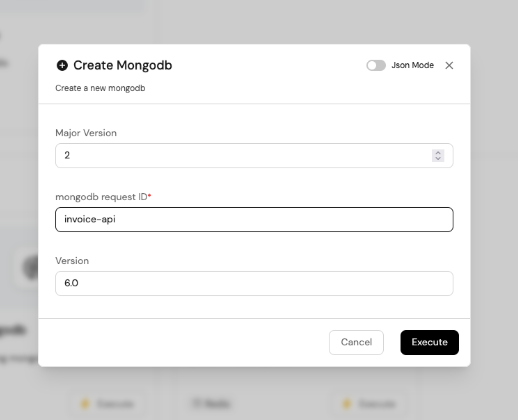
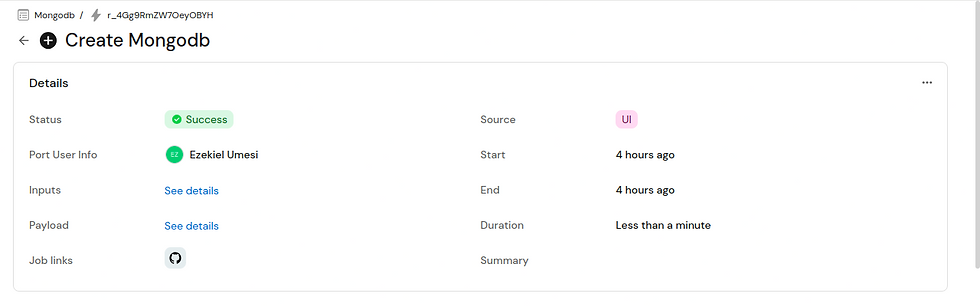
Once you execute, you’d see the following response to show that the DB was created successfully.
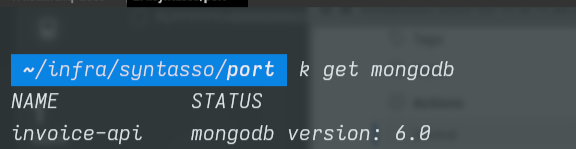
Verify that MongoDB was indeed deployed, by running the command below in your terminal:
Your output should be similar to:
Step 4: Update the MongoDB instance and demonstrate Day-2 operations
In the same way, Kratix’s integration with Port for MongoDB can be useful in performing Day 2 operations on the database. From the self-service dashboard, you’d see the Update MongoDB option where you can perform these operations. To initiate an update, click on the Update MongoDb option. It looks like this
To update the MongoDB instance, click on the execute button, and a pop-up will appear on your screen.
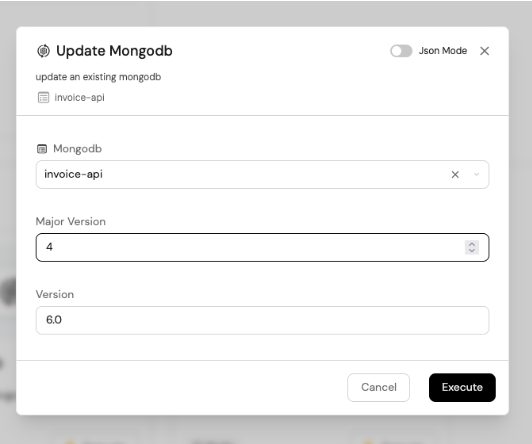
Fill the form by selecting the database you want to update from the drop-down menu. For example, you can bump the major version from 2 to 4.
Then click on Execute.
Once again, you can verify that the MongoDB instance was updated by running the following command:
The output is similar to:

Transforming MongoDB into a platform service with Kratix and Port
This article explored how Kratix and Port turned MongoDB from a manually managed database on a Kubernetes cluster to a self-service platform capability.
We covered how to automate the provisioning of production-ready MongoDB instances using Kratix Promises. We also showed you how it provides developer self-service via Port’s UI, with no YAML expertise needed, and also showed how this setup handles Day 2 operations.
Setting up MongoDB with Kratix and Port provides the best of both worlds. Developers have the freedom to spin up database resources on demand, and platform engineers can implement compliance, security, and cost optimisation features across a fleet of clusters at scale.
Visit the Kratix Marketplace for additional information on Kratix by Syntasso and how it streamlines the creation of internal developer platforms. You can also look at the MongoDB Promise and other beneficial promises for your platform configuration.


Comments